Optics Trainer
0
Product was successfully added to your cart

Cart

  • HOME
  • EYE TRACKING
  • VIRTUAL REALITY
  • HOME THERAPY
  • SHOP
  • FIND A PROVIDER
  • CONTACT

Oculus Quest Home VR Setup

Home Oculus Quest Home VR Setup
  1. Download the OTVR_Quest.apk provided through email
  2. Create Organization
    To allow installing apps & games to your headset we need to enable developer mode. To do this, you have to be a registered “developer” on the Oculus website. This process is free, quick and easy to setup. Go to dashboard.oculus.com on your PC and create an ‘organization’. You’ll be asked to accept the developer agreement.
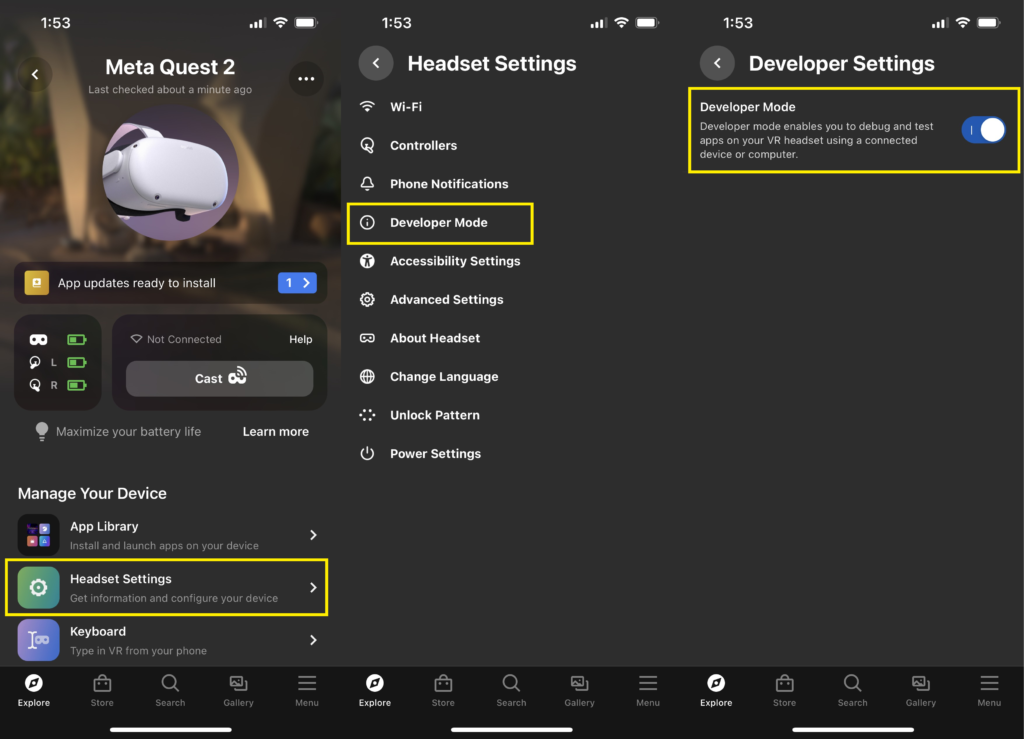
3. Enable Developer Mode and Reboot

Now that you’re a “developer”, open the Oculus app on your smartphone or tablet. In the Settings tab, tap on the headset and tap ‘More settings’. In the list, you should now see Developer Mode. Once you have enabled developer mode it is a good idea to reboot your headset to be able to see it on the device.

4. Connect USB Cable and Allow USB Debugging

Now its time to connect the USB cable. Once you are connected you will have to allow USB debugging access on your headset. If you put your headset on at this point you will see something like the below. You should also select ‘Always allow from this computer’ to prevent this message from coming up every time you connect.

Important 1): Disable Unlock Pattern in the Oculus app in Settings > Quest > More Settings > Unlock Pattern.
See the image in Step 2 for more info.

Important 2): Try a phone USB cable instead of the cable that comes with your Quest.

5. Download and Install SideQuest – Advanced Installer ( LTS ) for your Mac or PC: LINK

NOTE: Make to click the download link under Advanced Installer ( LTS ), NOT the Easy Installer ( Beta )

6. Open SideQuest and click Install APK and file from folder on computer  icon (see below)

7. Navigate to the OTVR_Quest.apk file and click “Open”. (This will typically be located in your Downloads folder)

8. Click on the RED box with the number 1 in it to check the status of the install

9. When successful, you’ll see a green notification saying APK file installed ok!

10. You have successfully loaded the software onto your Quest. At this point you no longer need Sidequest (it’s only used to load the software for the first time). The next step is to start Optics Trainer VR. On your headset, navigate to your Apps. Make sure the Quest is selected, and choose Unknown Sources on the rightmost drop down. You can then select Optics Trainer VR

11. When opening Optics Trainer VR for the first time, enter the License Email and License Key provided through your confirmation email.

  • Terms of Service
  • Privacy Policy
  • Find a Provider

Products

  • Optics Trainer VR (Software Only) - Unlimited $4,999
  • Optics Trainer VR Bundle $7,999 $7,222
  • Optics Trainer Eye Tracking V2 (Software Only) - Unlimited $2,599
  • Optics Trainer Eye Tracking Bundle (V2) $3,599

Contact Us

contact@opticstrainer.com

Follow Us

Email
Facebook
Twitter
Google+
LinkedIn
Instagram
  • Terms of Service
  • Privacy Policy
  • Find a Provider
© 2021 Optics Trainer, LLC